Post by armchair general on May 30, 2017 16:15:51 GMT
Kampfgruppe Pieper, The Breakthrought. Stavelot, December 1944.
The race was on to break throught the american lines for the men of KG Pieper as they had already suffered many delays due in great part to massive traffic jams and determined rearguard actions by retreating american formations. The Kampfgruppe was made of elements of 1st SS Liebstandarte panzer division, 501st SS schwere panzer abteilung (equiped with king tigers) and 150th "special" panzer brigade using captured US vehicles led by the infamous Otto Skorzeny.
Having failed to take control of Malmédy, Stavelot and its stone bridge was Pieper's next objective on December 18th. But in the meantime the village held by the US 291 engineer battalion had been reinforced with units from 825th tank destroyer battalion and the 526 armored infantry brigade.
The bridge had been prepared for demolition but Pieper had to be faster than the americans, so despite the traffic jams the first unit sent forward was to be Skorzeny's brigade with its US jeeps and SS soldiers dressed as americans...
Would the trick work this time?
Maps:
West-Map 14 (number in the lower left corner)- Map2 (number LLcorner)-East.
Place river hexes all along the middle of the map (on those half hexes joining the too maps).
A movement roll is necessary to cross the river. If a vehicle fails its movement roll it becomes stuck in the hex it wanted to cross.
There is a stone bridge on D40X (naturally following the road). King tigers being too heavy, cant use the bridge!
The bridge does not provide cover for units on it.
Finally: Place 2 Strongpoints on D39X and D47X. See custom card.
Kampfgruppe Pieper: Set up up to 5 hexes from the east side (half hexes are in play) on map 2
SS leader SS panzergrenadier x7 Mg 42 x2 81mm mortar x2 Disciplined spotter Kubelwagen Messerschmitt bf 109 x2
150th "special" pz brigade:
US jeep x3 Disciplined spotter SS stormtrooper Werhmacht oberleutnant All infantry start mounted on jeeps and MUST cross the bridge.
Special rule: this unit wore US uniforms and was to infiltrate enemy lines.
When in the same hex as a US unit roll a dice; on a result of 4+ the jeep passes unoticed.
Such a jeep doesnt count for stacking (limit of one jeep per hex) and cant be attacked unless it fires at US units.
On a roll of 1, 2 or 3, place a disrupted counter on the jeep and the german infantry unloads untouched but is unmasked!
If the german unit is killed or disrupted the jeep (if still in play) returns in the US line up!
Enter on turn one on the eastern road hex:
Sdkfz 251 x1 SS panther Pioneers (while on the bridge pioneers can permanently desactivate the bridge's bombs on a roll of 4+).
Enter on turn 2 on the road hex:
SS panther ausf G SS panzer IV Sdkfz251 SS stormtrooper
Enter on turn 3 on the road hex:
King tiger Sdkfz 251 Pioneers Flakpanzer IV wirbelwind
Elements 526th armored infantry brigade:
set up anywhere on map 14, but not on river hexes.
Strongpoint x2 Red devil Garand x7 Thompson gunner x3 M5 halftrack jeep M1919 mg 3 inch gun x2 M1 mortar Quad 50 Untested recruit x4 Bazooka x3 Engineer x2 (At the start of turn 6 engineers on the bridge can blow it up on a roll of 4+)
Enter on turn 2 through the road hex:
M36 MGC x2 M8 greyhound x2
Enter on turn 4 on the road hex:
Easy eight M4A1 sherman Brushcutter sherman Resourceful hero (place as per card rule) P51D mustang x2
Victory conditions:
At the end of turn 8: The germans win if they control the bridge and the 2 strongpoints. A breakthrough has been achieved.
The US win if the germans fail the above conditions or if they manage to blow up the bridge!
Sources: KG Pieper dans les ardennes- Jean Philippe Liardet (champs de batailles) La bataille des ardennes- Keith Johannsen (champs de batailles numéro 4)
Post by armchair general on May 30, 2017 3:58:31 GMT
[NOTE: This is part of the continuing effort to migrate as many scenarios as possible from the original Forum to the new one. Any assistance or feedback is always welcome!]
[NOTE #2 by armchair general: Since this scenario was created a while ago and could be updated, if you have any ideas, please let me know!]
Originally posted by MrBluze 01-26-2006 in the old AH forums
[note by Neural Dream: This is part of the forumini project of recovering the most popular scenarios and campaigns from the old forums to an active forum instead of letting them die in an archive. I haven't asked all authors' permission for re-posting their brilliant work, since many have now left the community and cannot be contacted.]
Race To Berlin
This scenario can be played out with 3 factions. The Soviets as one faction, another faction would be the United States, United Kingdom and France (US/UK/FR), the third faction would be Germany. The scenario represents the race between the Soviets and the US/UK/FR to defeat Germany and post war control of Berlin. This is best played with 3 players each representing each faction.
Victory conditions: The Allied faction to enter Berlin by turn 7 and the elimination of 50% of the German Army points. If the Allies enter Berlin by turn 7 and the German Army has not lost 50% of its points then play is to continue on until the 50% point reduction has been met. If this is not done by turn 10 each faction separately adds up its points to determine the winner.
Axis Army build up is 200 points. It may be greater if all players agree. The point total should not be more than 350 points.
Allied Army build up is a total of 50% more than the Axis Army, then split in half by the two factions. For example if the Germans have a total of 200 points the each Allied Army would have 150 points.
Map build.1 George 1,2 George 2s and 2 Easy 1s.Going from left to right would be Easy 1,George 2, Gerorge1 George2, and Easy1.The first map on the left (Easy1) is the most eastern map and the last map on the right( the other Easy1) is the most western map. The hills on the Easy1s are on the most eastern and western edge of the combined map.
3) All German solider's speed movement is 2 in the city of Berlin.
Deployment: The Soviets enter the game on the roads on the Eastern Easy1 map. The US/UK/FR enter game on the roads on the Western Easy1 map. Both factions start off the board and enter on the three roads on the Easy1s. This way the two factions have to manage a convoy movement. Each Easy1 map has 3 roads to enter on.
Initiative: The Soviets always have the option to go first, second or third (they were the first ones to reach Berlin). The US/UK/FR ROLL for the remaining choice of turns. Since the Germans are battling two fronts, the German player battles the both side on his turn.
Options:
Another Victory condition can be the number of city hexes claimed by each faction. At the banging of the game the German faction puts a marker on each hex that is occupied by a vehicle or two soldiers. If and when a hex is moved into by one of the Allied factions then that faction removes the German marker and replaces it one of their own. If it is agreed upon before the beginning of the game the two Allied factions can fight over a hex. For example the US/UK/FR faction won control of a hex and later in the game the Soviet faction decided to take control of that hex and the US/UK/FR did not want to relinquish control then the two factions would battle over that hex. This would lengthen the game to 12 or 15 turns. There would be a 1St, 2nd and 3rd place according to the number of markersplaced.
Another Victory condition would be to find Hitler and his staff by the end of turn 10. Before the game starts the German player secretly writes down the location of the Fuehrer and his staff. The German player would have to inform the Allie player when an Allied unit has entered that hex which would be a victory for the Allies. Preventing the Allies from doing so by end of turn 10 would be a victory for the Axis player.
The above scenario and the different options have been played out a number of times at Unicorn Games in Oakdale MN and Village Games in Anoka MN. After a total of 5 battles the Allies have won 3 times and the Axis twice. We made changes along the way to balance the scenario. We had 6 players at one time, which proved too cumbersome. We had to increase the total number points for the Allies to help balance the scenario. Once we had no terrain tiles for the Allies to place, which created a greater challenge for the Allies. Another time we allowed the allies to have 4 terrain tiles which gave them a distinct advantage.
Deployment: The Soviets enter the game on the roads on the Eastern Easy1 map. The US/UK/FR enter game on the roads on the Western Easy1 map. Both factions start off the board and enter on the three roads on the Easy1s. This way the two factions have to manage a convoy movement. Each Easy1 map has 3 roads to enter on.
Initiative: The Soviets always have the option to go first, second or third (they were the first ones to reach Berlin). The US/UK/FR ROLL for the remaining choice of turns. Since the Germans are battling two fronts, the German player battles the both side on his turn.
Here a few tactics that have been used and worked out so far.
· One US/UK/FR player used two Jeeps with a B.A.R. Gunner and a Marine flamethrower quite effectively. He was able to move around inside of Berlin (all city hexes have roads in them, allowing the jeeps with greater movement). The B.A.R Gunner suppressed fire from the Germans with cover fire when he had the initiative. Then he used the flamethrowers to try to toast the German unit that was suppressed.
· The paratroopers were used quite effectively towards the end of the game.
· The Sherman swarm proved to be effective on removing a SS Panther Ausf G.
· German players usually defend both sides of the city with at least 4 Pac 40s. One is usually placed in each corner of the city. They are cheap but deadly against Armor. With a low defense cover rolls are important. They never are moved so disrupted markers do not mean much except on the reduction of successes when rolling during the attack phase.
· One German player disrupted a Kv-1,with his Pac 40s. Then sent out two SdKfz 251s mounted with a Panzergrenadie (from set II, not the SS) and a Wehrmacht Oberleutnant to destroy it. These two solider units work out well together if you look at the special abilities. The Soviet player made the mistake of not having any soldiers or other armor for support for his Kv-1.
· Also a German player moved out of the city and took control of the terrain tiles that both factions had placed and slowed their advance on Berlin. This was an excellent move on the German player’s part. I know because I was the US/UK/FR player in this game.
Post by armchair general on May 30, 2017 3:53:02 GMT
[NOTE: This is part of the continuing effort to migrate as many scenarios as possible from the original Forum to the new one. Any assistance or feedback is always welcome!]
[NOTE #2 by armchair general: Since this scenario was created a while ago and could be updated, if you have any ideas, please let me know!]
Originally posted by zkraut 07-21-2006 in the old AH forums
[note by Neural Dream: This is part of the forumini project of recovering the most popular scenarios and campaigns from the old forums to an active forum instead of letting them die in an archive. I haven't asked all authors' permission for re-posting their brilliant work, since many have now left the community and cannot be contacted.]
Battle of Okinawa, Item Rock region
Okinawa is one of the Ryukyu islands south of Japan. Okinawa was one of the first battles to be fought on the Japanese homeland. Some battles, like Iwo Jima had no japanese civillians. Okinawa but Okinawa had a large indigenous civilian population, 150,000 of those civillians being killed in the fighting. Civillians being influenced by Japanese propaganda, that the americans were barbarians who committed horrible atrocities, some killed themselves. The battle of okinawa had more casualties than the battle of Iwo Jima and Guadalcanal combined.
The battle was fought for as long as 82 days, starting on April 1st, 1945. The battle was fought in the southern and northern part of Okinawa, most of the casualties in the south. In the north the Americans took Kadena air base, which is of 2005, the biggest air base in Asia. In the south the Japanese were fortified, hiding in caves with hidden machine guns and explosives.
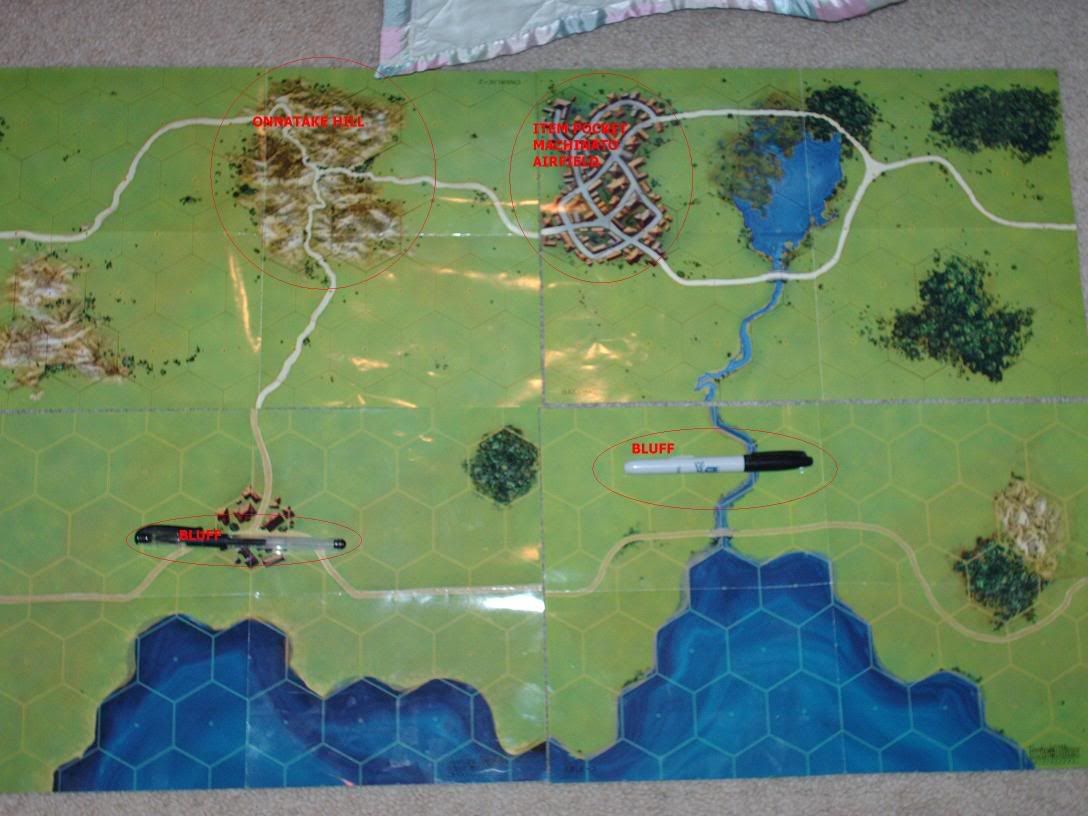
The item pocket region, in southern Okinawa held Machinato airfield, a vital airfield for american bombers to reach other Japanese islands for Operation Downfall to succeed. Heavy fighting occured on Machinato airfield. Onnatake hill was a very fortified hill that needed to be taken.
In this scenario you are commanding either the japanese defenders of their homeland, or you are the american landing forces. The 27th infantry division took Onnatake hill and fought in Item pocket. The item pocket region was a heavily fortified region that blocked the way for other invasion troops.
Only Marines can go into the Amtracks. One marine M2 flamer can travel with the Higgins though. Amtracks get heavy transport in this scenario.
The Axis:
4x type 92 Machine gun team, 2x Type 89 Mortar, x7 Arisaka rifleman, 2x Imperial sergeant, 1x Honor bound hero, 1x Imperial sniper, x3 47mm type 1 anti tank gun.
124 POINTS
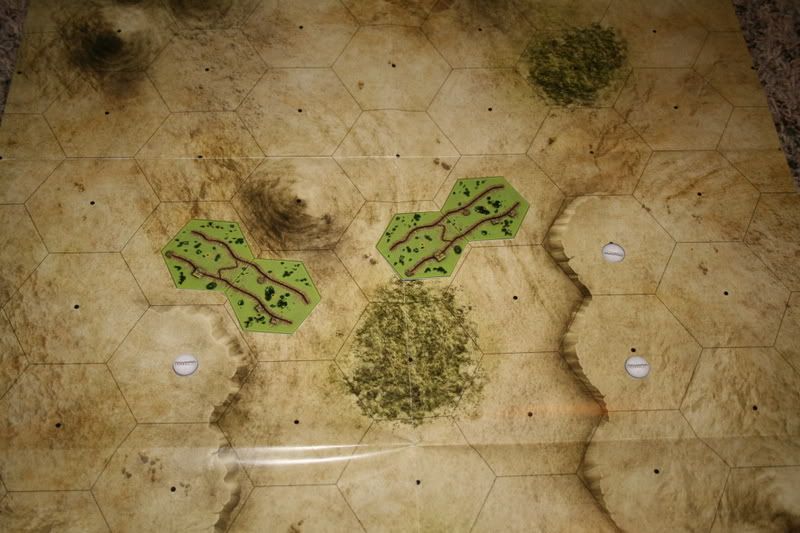
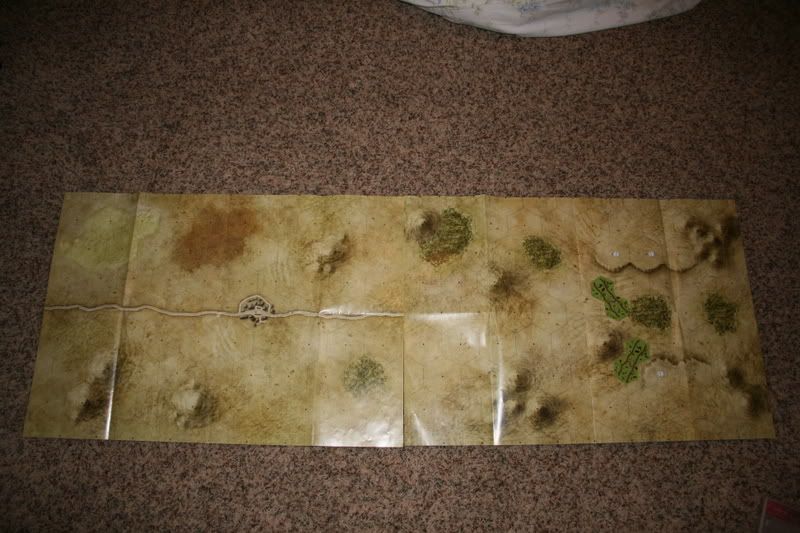
Map Pieces:
The Airfield and Hill are the 2 objectives.
Use a Pen or pencil for bluffs in the areas shown. The axis player may put 2 pillboxes on the bluff, along with 2 Type 92 machine gun teams. 1 for each bunker.
Special Rules:The allied player deploys one the southernmost hexes in the ocean. The shermans are considered DD and move in the water. The allied player has 10 turns to take both objectives, if neither objective is taken by the allied player by the end of turn 10, the axis player wins the battle.
The axis can deploy on either of the two objectives, and in the bluffs.
Post by armchair general on May 30, 2017 3:44:52 GMT
[NOTE: This is part of the continuing effort to migrate as many scenarios as possible from the original Forum to the new one. Any assistance or feedback is always welcome!]
[NOTE #2 by armchair general: Since this scenario was created a while ago and could be updated, if you have any ideas, please let me know!]
Originally posted by PatrickWR 11-09-2005 in the old AH forums
[note by Neural Dream: This is part of the forumini project of recovering the most popular scenarios and campaigns from the old forums to an active forum instead of letting them die in an archive. I haven't asked all authors' permission for re-posting their brilliant work, since many have now left the community and cannot be contacted.]
Withdrawal Across The Dnieper - October 1943
Rallying around victories at Kursk and Kharkov, the Soviet juggernaut picked up steam as it pursued the German Army Group South through Ukraine. It was the hope of the German commanders that the retreating Wermacht and SS contingents could (yet again) attempt a defense at the Dnieper River and bleed the Soviets through the winter of 1943.
It was not to be. German units did indeed cross the Dnieper as part of their fighting withdrawal, but they found the opposite riverbank almost impossible to hold against teams of determined Soviet shock troops. Using rowboats and bridging equipment, the Soviets pressed the attack as winter swept through Eastern Europe. The vanguard of the Red Army had almost constant contact with the retreating Germans along the length of the Dnieper River. This scenario represents a clash between German rearguard units and advancing Soviet forces on the contested west bank of the Dnieper River.
Victory Conditions
There are 14 town hexes on the four maps. At the end of turn 8, the player who controls the most town hexes is the victor. In case of a tie, keep playing and check victory conditions again at the end of turn 10.
German Forces – 120 points of pre-1944 German, Italian and Romanian units
Important note: No SS units are allowed for the Axis player in this scenario.
Soviet Forces – 100 points – may consist of units from the following list:
Optional for campaign play: The player who won the Battle of Kharkov aaminis.myfastforum.org/about602.html scenario may add +10 points to his or her army build allotment.
Map set-up
Charlie 1/Able 2
Baker 2/ Dog 1
Orienting the maps horizontally as described above, north is “up” for the viewer.
The German forces may deploy inside of and up to one hex around the town hexes on the westernmost edge of Charlie-1 and Baker-2. Soviet forces may deploy on the first 2 hexes on the easternmost edge of Able-2 and Dog-1.
Conclusion: The Germans found the Dnieper to be highly indefensible, due to the tenacity of the Russians in crossing the river and establishing beachheads under heavy fire. Many Germans divisions found themselves trapped between encroaching Soviet forces and the very rivers they had been tasked to defend, which in turn led to several heroic breakout attempts as the spring thaw began.
Post by armchair general on May 30, 2017 3:36:22 GMT
[NOTE: This is part of the continuing effort to migrate as many scenarios as possible from the original Forum to the new one. Any assistance or feedback is always welcome!]
[NOTE #2 by armchair general: Since this scenario was created a while ago and could be updated, if you have any ideas, please let me know!]
Originally posted by PatrickWR 11-06-2005 in the old AH forums
[note by Neural Dream: This is part of the forumini project of recovering the most popular scenarios and campaigns from the old forums to an active forum instead of letting them die in an archive. I haven't asked all authors' permission for re-posting their brilliant work, since many have now left the community and cannot be contacted.]
Battle of Kursk – Prokhorovka, July 1943
As the German army retreated from the Soviet Union following decisive defeats at Stalingrad and Moscow, they sought refuge behind their own defenses at the Panther-Wotan line. As they withdrew, Wermacht and SS units conducted rearguard actions to slow the inevitable Soviet counterattack.
By 1943 a Soviet-held bulge in the German defensive lines had developed around the city of Kursk. To maintain their integrity, German high command laid plans for a massive assault on Kursk. Knowing that theirs was a threatened position, Soviet engineers turned Kursk and the surrounding villages into a veritable fortress of earthworks, minefields and defensive emplacements.
On July 5 the German Wermacht and SS armored units advanced on the Soviet positions across the Kursk salient. Some divisions made initial progress, but almost all encountered stiff Soviet resistance. General Hoth’s 4th Panzer Division smashed into Soviet defenses around the town of Prokhorovka, which later developed into a pivotal battlefield. This scenario represents the initial contact between the German vanguard and Soviet defenders at Prokhorovka.
Victory conditions
Germans must push through the town and exit at least one vehicle from the Soviet end of the map. The Russian player wins if he or she prevents the Germans from overwhelming the town (ie exiting a vehicle off the map). The game lasts 8 turns; if the German player has not exited a vehicle off the map, the Soviet player claims the victory.
German Forces – 120 points – may consist of any pre-1944 German, Italian or Romanian units except the Sdkz 222 and the SS-Panther, which was conspicuously absent from the battle of Kursk.
Soviet Forces – 90 points – may consist of units from the following list:
Commissar Cossack Captain Mosin-Nagant PTRD -41 AT Rifle PPSh-41 SMG ZIS-2 57mm AT Gun T-34 KV-1 T-70 M5 Half-Track M3 Stuart Jeep Vickers MG Royal Engineers
Special Rules: Royal Engineers may use their Bridge Demolition ability to destroy road hexes. If successful, vehicles moving along destroyed roads no longer gain the movement bonus.
Map setup
Able 1/Baker 1
Charlie 2/Dog 1
Orienting the maps horizontally as described above, north is “up” for the viewer.
The German forces may deploy within 3 hexes of the westernmost edge of Able 1 and Charlie 2. Russian forces may deploy in the town hexes on Baker 1 and Dog 1 and up to one hex outside the town hexes.
Conclusion: Although German forces originally overran Prokhorovka, just a few days later it was the site of the largest armored engagement in the history of warfare – and a stunning defeat for the Germans at the cost of hundreds of tanks and thousands of soldiers.
Post by armchair general on May 30, 2017 3:22:06 GMT
[NOTE: This is part of the continuing effort to migrate as many scenarios as possible from the original Forum to the new one. Any assistance or feedback is always welcome!]
[NOTE #2 by armchair general: Since this scenario was created a while ago and could be updated, if you have any ideas, please let me know!]
Originally posted by PatrickWR 11-06-2005 in the old AH forums
[note by Neural Dream: This is part of the forumini project of recovering the most popular scenarios and campaigns from the old forums to an active forum instead of letting them die in an archive. I haven't asked all authors' permission for re-posting their brilliant work, since many have now left the community and cannot be contacted.]
Battle of Kharkov – August 1943
After the Allies invaded Sicily on July 10, 1943, Hitler made the critical decision to cancel Operation Citadel. The German effort to crush the Soviets at Kursk had effectively ended, and an entire SS contingent was sent from the Eastern Front to Italy, to help repel the invaders. At this same time, Soviet tacticians (unaware that the true battle was over) spearheaded a massive counteroffensive at the end of July. This attack renewed the momentum that the Soviet army had enjoyed immediately following the victory at Stalingrad, and Soviet forces gained ground as they once again pursued the retreating German army westward.
Kharkov lay in the path of the advancing Soviets as they pushed into Ukraine. The devastated city had changed hands three times during the war, and now the Soviet vanguard was determined to dislodge the German defenders. This scenario represents the final pitched battle to reclaim Kharkov.
Victory conditions
There are 12 town hexes on the four maps. At the end of turn 8, the player who controls more town hexes is the winner. In case of a tie, continue playing and check victory conditions again at the end of turn 10.
German Forces – 120 points of pre-1944 German, Italian and Romanian models.
Soviet Forces – 120 points – may consist of units from the following list:
Commissar Cossack Captain Mosin-Nagant PTRD-41 AT Rifle PPSh-41 SMG Fanatical Sniper ZIS-2 57mm AT Gun T-34 KV-1 T-70 M3 Stuart M5 Half-Track Jeep Vickers MG
Optional for campaign play: The player who won the Battle of Kursk scenario may add +10 points to his or her army build allotment.
Map setup
Charlie 1/Able 1
Baker 1/ Dog 1
Orienting the maps horizontally as described above, north is “up” for the viewer.
The German forces may deploy in the first 4 hexes on the westernmost edge of Charlie-1 and Baker-1. Soviet forces may deploy on the first 2 hexes on the easternmost edge of Able-1 and Baker-1.
Important note: Treat all pond hexes as forest hexes. I recommend using the forest hexes from the Combat Zone kit to cover up the ponds.
Conclusion: The Soviets reclaimed Kharkov, although over 70% of the city was destroyed during the war. The German army continued to fall back, and the Soviets pursued them across Eastern Europe.
Post by armchair general on May 30, 2017 2:58:12 GMT
Gracias!
Well, now that the school year has come to a close, I'm going to spend the next 2 days migrating as many scenarios as possible. I have hard copies of most every scenario, so the ones I don't get to now, I'll be re-creating them one at a time.
Post by armchair general on May 30, 2017 2:54:44 GMT
Gents:
Hola!
As I continue to try and move as many scenarios as possible before June 1, I had a question. Since Sturmvogel was nice enough to create pdfs for many of the scenarios, is there a way to move them here? I imagine that would involve a cloud service like DropBox or Scribd, right?
Post by armchair general on May 27, 2017 4:14:33 GMT
[After being informed that the Pzkpfw 38(t) was not used in NA, Snippersly suggested subbing with x2 Panzer II Ausf. C]
[Bartok had some questions on July 14, 2009]
a few questions:
The allies starting area is 5 hexes from the edge, like axis.
The axis victory condition is capture the 3 bluff hexes with Grant, no allies units must stay in those hexes at this time.
You change the Strong Point from original Wizards tile: Double cost for High Gear vehicles, and a roll movement for HG vehicles. Now all vehicles must make roll movement?.............and HG vehicles pay double cost?
Axis vehicles are -1 speed on the even turns 2, 4, 6 and 8 (you put 7)
The cover for Grant is +5, +6………… are Large Silhouette (-1) but are dug in too(+1), or loose Large Silhouette and gain cover with +4, +5,+6. The defense is 6/4
For overwatch Allies 256 pts: 4 Axis 306 pts: 6 overwatch………… Add up the units in the army, divide by 100, round down, and multiply by two. That's how many units the army can place on overwatch. Figure it separately for each side.
[Snippersly replied..]
Wow! Its been a while since I wrote and played this. Let me see if I can dissect your questions and answer them:
1) 5 Hexes. They can begin in front of the Strong Points. Monty had a couple of smaller tanks out front to draw the Afrika Corp into their trap.
2) Must capture the 3 bluff hexes. See the photos above for the exact objective hexes.
3) Play the Strong Point Hexes as per WoC rules. Thereshould be no changes. Sorry if that was confusing.
4)2,4,6,8...I type to fast sometimes. Should be even numbers.
5)Cover and Front Hull are +1. So a roll of a three is now a four. Front armor is now a 6. They were dug in, below their tall silhouette, as you can see, they cant even fire thier hull cannon cause they were so deep.
6) Huh? You figure Overwatch however you want.
[bartok's reply on July 15, 2009]
Thanks for quick reply.
"So a roll of a three is now a four".
Normally, cover for vehicles are 5, 6. If they were dug in, and they loose tall silhouette, for instance their cover rolls are 4, 5, 6. If they don´t loose "tall silhouette", their cover rolls should be 5, 6.
Can you tell me your opinion about cover´s Grant, are my final objective..........yeahhh
I suppose Grant are Large silhouette and dug in.
I think this is the correct overwatch for this points.
2 possibilities:
Grant (1942) Speed 0, Defense 6/4 Large Silhouette (saves for cover with 5, 6)
or
Grant (1942) Speed 0, Defense 6/4 (saves for cover 4, 5, 6)
Another question, if a Messermitch 109 is hit in turn 1, can deploy in turn 3, or must stay out for turn 3 for disruption counter (face up)............i think it can fly again but.....
Right for the strong point , it cannot stop a tank, only wheeled vehicles must roll for movement and double cost.
I will put 2 x Panzer II ausf.C (i know losing a 4 points, but i really like the 2X PZKpfw 38(t) stats: 7/7/6 and 8/7/5
Post by armchair general on May 27, 2017 4:01:53 GMT
[NOTE: This is part of the continuing effort to migrate as many scenarios as possible from the original Forum to the new one. Any assistance or feedback is always welcome!]
[originally posted by Snippersly on Feb. 7, 2009]
This is another big scenario...I seem to write a lot of these. Anyway, get ready for a tough fight on both sides and a lot of fun. We play tested this last Tuesday at our FLGS with out regular group and had a blast. It was a narrow victory for the allies, but with a few modifications in tactics, it could have gone to the axis. If you play it, please let me know and feedback is welcome. Enjoy!!
Battle of Alam el Halfa August 30 to September 5, 1942 North Africa Desert - Alam el Halfa Ridge
Maps: D2 & D3 Desert Maps from NA Map Pack
Setup: UK sets up first on Map D3 in the designated starting areas. Germany deploys second on Map D2 up to 5 hexes from the edge. The maps are placed end to end not side to side as in typical scenarios. (Long ways). In front of the two ridges, the UK units have 2 strong points with which to fight from. See pics below.
Designer notes / Historical Overview: This is a battle that was fought between the 1st and 2nd Battle for El Alamien. The Alam el Halfa Ridge was a strategic point and Rommel wanted it captured. Short on fuel and supplies because of his 800 mile supply route across the desert, he decided to strike quickly before the Allies could make thier own resupply closer to the objective and out strip Rommel of men and equipment.
Mustering his forces, Rommel moved in for what he thought would be a fairly simple battle. However, Monty decided to fight defensively and dug in his tanks and men and held his tanks back to prevent them from being destroyed by the Afrika Korps superior tank tactics. Hull down and waiting, Monty's tactics won the day for the Allies.
Withdrawing and facing a long and dwindling supply line, this battle was the turning point in Rommels defeat in the desert.
Allies: United Kingdom / New Zealand General B. Montgomery XIII Army
Tanks: 1X Stug III Ausf G 19 Pts 1X Veteran PZIII Ausf L 19 Pts 1X Panzer IV Ausf E 14 Pts 1X Panzer IV Ausf G 22 Pts 2X Panzer II Ausf C 20 Pts
Aircraft: 2X ME 109 28 Pts
AXIS TOTAL: 309 Points
Special Rules:
1) The UK Grant I tanks were dug in during the battle for better defense and to prevent them from becoming torn apart by Rommel's anti-tank screen. As a result, once the Grant I tanks are placed on the map, they cannot move, and are considered in cover. Since they are dug in, they cannot fire their hull mounted cannon. However, they do have a +1 on cover rolls. The Grant Tanks deploy only on the ridge hexes.
2) All obstacles must be deployed in front of the UK forces. No UK units can be in front of any obstacles at the start of the scenario. There are two strong point hexes on the map the infantry can fight from. Strong Points are +1/+1 Defense and +1 Cover for infantry in the strong point hex. Vehicles must make a movement roll to cross the strong point hex.
3) German aircraft can only deploy on the odd turn #s. (1, 3, 5, & 7) Allied aircraft suffer no penalties or restrictions.
4) Due to the long supply lines and fuel shortages Rommel suffered from, all Axis vehicles are -1 speed on the even turns (2, 4, 6, 7) unless they travel on a road hex.
5) All tanks have Exposed Transport SA.
6) All wheeled vehicles have towing ability.
7) 8 Turns in length.
Victory Conditions:
1) Axis units must capture the 3 bluff hexes occupied by the UK Grant Tanks.
2) Allied victory- repel Axis invastion of Alam El Halfa
Allied Objectives and starting area - Up to 5 hexes in.
Post by armchair general on May 27, 2017 3:48:21 GMT
[Richter von Manthofen had this reply on Feb. 22, 2009]
thanks Palasades.
Indeed ever second turn offloading is what I had in mind. (The intent was to add a "transfer area"for he boats off map for their first turn (in reach of "coastal" guns to reprersent the advancing boats.
Hmmm obstacles and bunkers - seems to be a good idea - actually I myself thoght, but as in 1942 the atlantic wall was not as big as in 1944 I was unsure about it.
seems I should add a gun or two and/or some troops.
Post by armchair general on May 27, 2017 3:47:06 GMT
[Pasalades wrote this reply on Feb. 21, 2009]
Ok, I had a chance to give this scenario a go today and it was very fun to play. I got a chance to use my higgins boats again and play on the beach invasion map, which I find to be the best of the 2" maps.
Sadly for the Germans they received a brutal curb-stomping and were completely wiped out on the ground by turn 6. Even while on the defense, units can't stand up to concerted attack, especially from behind. While I positioned the Germans on the bluffs to get the bst field of fire and to reach the incoming boats, the Canadians on the beach dived for the nearest shell holes for cover of their own. The first trun saw all of the Paks and Mortars disrupted or destroyed while only a single higgins was sunk. Once the threat to the boats were gone, heavy units could be landed with impunity (Dregs made up the first wave to save the best units for when the guns were gone). After turn two the German flank was turned as the units on the rightmost bluff were eliminated and the slow inevitable process of grinding down the rest of the defenders begun.
Some means of increasing the longevity of the defenders should be used, such as a 'Dug In' SA or obstacles and bunkers. When deploying on the bluffs, which is a necessity to keep units pinned on the beach, attacks from behind with aircraft eliminates the cover from the bluffs. If the paks are placed further back in swamp or forest, it might help, but seems weird for anti-tank guns holed up in the corner in a group taking down watercraft.
The rules for placing units on and off the boats are a little fuzzy as well. It might help to clarify during which part of the turn each action takes place and how disruption, destructon and being loaded allows changes that. I came t the conclusion that units were loaded at the begging of each turn and were unloaded at the same time, however they could not unloaded until they were 'moved-up' during the assault phase. This meant that an unscathed higgins would deliver units once every two turns. Given the length of the scenario this is probably what you had in mind. I had to make boxes to keep straight where each higgins was though at it was a little confusing.
I think the unit count is fairly balanced otherwise, though tosing in some panzerfausts to deal with the Churchills would be helpful. I look forward to playing it again after you've tinkered with it a bit.
Post by armchair general on May 27, 2017 3:41:01 GMT
[NOTE: This is part of the continuing effort to migrate as many scenarios as possible from the original Forum to the new one. Any assistance or feedback is always welcome!]
[originally posted by Richter von Manthofen on Feb. 10, 2009]
Atlantic Coast Campaign
Operation Jubilee
Dieppe, France – 19.August 1942
The objective of operation Jubilee – or better known as the Dieppe Raid – was to seize and hold a major port for a short time. Secondary goals were to lure the Luftwaffe into a large planned encounter with the RAF and the use of Canadian troops should compensate for a long time of inactivity.
252 ships left various ports on the night of 18 August 1942 and approached the French coast. Then things began to go wrong.
MAPS – if available use the Combat Zone Beachhead maps!
Beach Assault Special rules:
German defenders deploy anywhere on the map – excluding the beach hexes.
Germany deploys first.
1 EENCO, 1 Vickers MG Team and 7 Canadian Riflemen and 1 Dingo Scout Car (Humber) are deployed at the beach
The remaining attacking Commonwealth troops have to be shipped to the beach by landing craft. They have available 4 Higgins Boats and a LCT at turn 1, losses are replaced by 1 Higgins Boat/LCT per turn (maximum 2 LCT). A LCT holds either an Churchill tank or a Dingo Scout Car (Humber Scout Car) and an Infantry or 3 Infantry.
Deployment of Landing Craft: One wave of Landing Craft is deployed in the “sea area” (sea area is considered adjacent to the MAP area) every turn. They are vulnerable to Artillery fire if the Artillery piece has enough range to fire over the map edge. Disrupted Landing Craft can’t move up to unload their cargo. Undisrupted Landing Craft can move up during the Commonwealth Attack phase to unload during next turn. Once unloaded Landing Craft are removed to be available as part of the next wave.
Turn length is 20 turns.
Victory Conditions:
Germany scores 1 Victory Point for every town hex occupied by at least one German unit (and no Commonwealth unit) per turn.
The Commonwealth scores 2 Victory points for every town hex occupied by at least one Commonwealth unit (1 point if also an German unit is in the hex) per turn.
Both players score 1 victory point for every 10 points worth of enemy units destroyed (including Landing Crafts – a LCT counts as 10 points for this purpose). Commonwealth units that did NOT enter a Landing Craft count double points towards Germany.
The side with more points at the end of turn 20 wins the game. If one side scores double the points of the other side it wins a deciding victory. It both sides score an equal number of points it’s a moral victory for the Commonwealth.
Commonwealth Forces:
Elements of 2nd Canadian Infantry Division:
2 Churchill IV Tanks (56 points) (exchange one for a Churchill Crocodile) 3 Humber Scout Cars (24 points) 5 Eagle Eyed NCO (35) 27 Canadian Infantrymen (81) (substitute SMLE No. 4 Rifles, MAS Rifles,…) 3 Vickers Machine gun Team (24)
Elements 1st US Rangers: 2 Rangers (14) (only one if you take a Churchill Crocodile)
Elements RAF Fighter Command No. 11 Group RAF: 3 Supermarine Spitfire (45) 1 Hawker Typhoon (21)
German Forces:
Elements 302nd Static Infantry Division (570 Infantry regiment):
3 Pak 38 Antitank Gun (30) 2 7,5 cm leIG 18 (14) 2 20mm Flak 38 (14) 3 MG 42 MG Team (30) 3 Light Mortar (12) 11 Mauser Kar 38k (33) Wehrmacht Oberleutnant (14) Disciplined Spotter (9)
Elements of Jagdgeschwader 2: 2 FW 190 (28) 1 Messerschmitt Ace (16)
Aftermath:
Operation Jubilee was a total debacle fort he attacking Allies as no major objectives were achieved. More than half of the attacking force of more than 6.000 were casualties (killed, wounded, captured). The defending 1.500 Germans had around 600 casualties. The RAF lost more than 100 planes while the Luftwaffe lost less than 50. Half of the attacking tanks were also lost.
But the lessons of this debacle were well learned and finally enabled the success of Operation Overlord.
As this is MY FIRST fleshed out scenario I share with the communits comments and suggestions are MOST welcome.
Post by armchair general on May 27, 2017 3:29:56 GMT
On June 8, general Hoth posted pictures of his match with Sharpe and the sons of Sharpe and Angel of Death. [general Hoth {from France} and Angel of Death {from the Netherlands} made a "pilgrimage" here to Cincinnati, and this is the scenario that was played]. Here are the photos of the match;


 Will fix that soon!


/about/bernard-montgomery-large-56a61b685f9b58b7d0dff27b.jpg)