

Post by weedsrock2 on May 3, 2017 3:00:10 GMT
By Seisen


its greenstuff. Its really the only reliable method of sculpting masters for latex molds so that the figures/terrain can be mass produced.
Ok, more work... islands have recieved black primer, paint, and ink. Next step will be to paint the ocean around the islands and then the final step will be flocking and adding foliage to finish out. Still not sure if these will end up on ocean tiles (as they currently are) for use on the AAWAS Game Map, or, if they will be without bases making them more universal for any naval table top gaming.

The prelim-set of generic islands and fortresses are done. They have recieved dull-coat, flock, and foliage. I painted the tiles pretty quickly, nothing special so dont cring at the water, afterall it may not be on the final product. There are some WOTC gun turrets on one of the islands... that is an example of personal modeling done using AAWAS spare ship parts etc... the actual islands WILL NOT have any turrets or ship parts added, allthough there will be spaces for you to add your own if you like.


By cealigh the MadScot
I am mounting these on heavy duty card stock so they have some rigidity to them and to fit in with how the 1D cards are formatted. Now I have also developed some islands that were not originally printed on cards, and used in some cases aerial photos of islands in the Pacific as models.
A step by step on how I made my Islands:
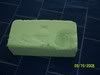
1) First I start with a block of dry foam used in arranging artificial flowers.
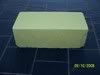
as you can see it can be carved and sculpted, but be careful because it is very brittle too.

2) I then use a very sharp long knife to slice it approximately 1/2" thick or there abouts. Depending on how big I want to make the Island I will either slice it down long ways into rectangles or into squares.
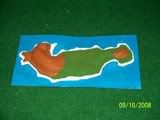
3) The next step is cutting out the general shape of the island. If you have a template then use the template as a cutting guide. I use a #1 exacto blade to cut out the shape.
4) Next step is sculpting it down. I use all kind of things for sculpting with but I found that using a large curved exacto blade works wonders along the edges to get the shore line.
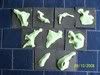
And thats how I did it!
5) Now that you have your island sculpted out how you want it to look it needs to be base painted. Now the choice is yours how you wish to do this but I have found it is much easier to handle the islands if they are glued to a card base. I usually start with what ever colour will be the over all color or predominiate colour on the piece.
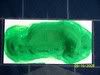
6) Continue to paint the island and it's base. Use white along the shore edges, you only need to go up to 1/8" around the edges. Paint brown or greens etc.

7) Once the paint has dried completely, it is now time to add the flocking. If you start with standard "white glue" then pour some into a small container (cold remedy cup is perfect) then add twice the amount of water and mix to thin it out. Using an old broad type paint brush, brush on the thinned out glue to where you wish to have the flocking, then sprinkle the flocking liberally over the glue, and allow to dry.
8) Add clumps of heavy foliage as desired
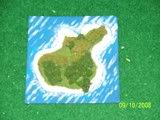
9) This is purely optional but I have found that if you spray a light coat of clear dull lacquer, that it will seal everything in.
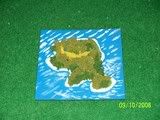
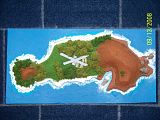
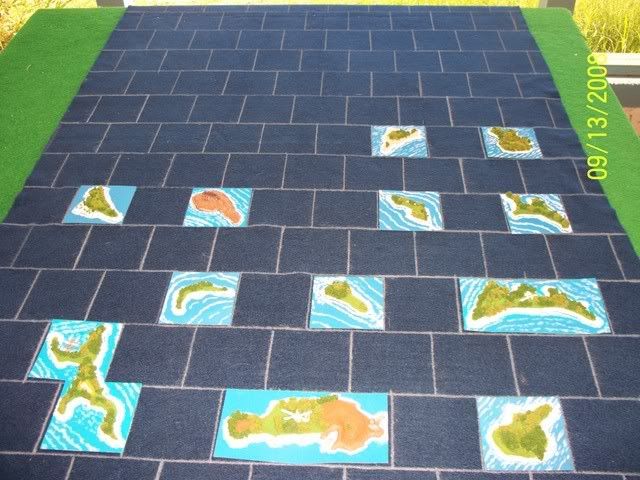
Here are the islands completed.

Now with foliage added and airfield detail.


its greenstuff. Its really the only reliable method of sculpting masters for latex molds so that the figures/terrain can be mass produced.
Ok, more work... islands have recieved black primer, paint, and ink. Next step will be to paint the ocean around the islands and then the final step will be flocking and adding foliage to finish out. Still not sure if these will end up on ocean tiles (as they currently are) for use on the AAWAS Game Map, or, if they will be without bases making them more universal for any naval table top gaming.

The prelim-set of generic islands and fortresses are done. They have recieved dull-coat, flock, and foliage. I painted the tiles pretty quickly, nothing special so dont cring at the water, afterall it may not be on the final product. There are some WOTC gun turrets on one of the islands... that is an example of personal modeling done using AAWAS spare ship parts etc... the actual islands WILL NOT have any turrets or ship parts added, allthough there will be spaces for you to add your own if you like.


By cealigh the MadScot
I am mounting these on heavy duty card stock so they have some rigidity to them and to fit in with how the 1D cards are formatted. Now I have also developed some islands that were not originally printed on cards, and used in some cases aerial photos of islands in the Pacific as models.
A step by step on how I made my Islands:
1) First I start with a block of dry foam used in arranging artificial flowers.
as you can see it can be carved and sculpted, but be careful because it is very brittle too.
2) I then use a very sharp long knife to slice it approximately 1/2" thick or there abouts. Depending on how big I want to make the Island I will either slice it down long ways into rectangles or into squares.
3) The next step is cutting out the general shape of the island. If you have a template then use the template as a cutting guide. I use a #1 exacto blade to cut out the shape.
4) Next step is sculpting it down. I use all kind of things for sculpting with but I found that using a large curved exacto blade works wonders along the edges to get the shore line.

And thats how I did it!
5) Now that you have your island sculpted out how you want it to look it needs to be base painted. Now the choice is yours how you wish to do this but I have found it is much easier to handle the islands if they are glued to a card base. I usually start with what ever colour will be the over all color or predominiate colour on the piece.

6) Continue to paint the island and it's base. Use white along the shore edges, you only need to go up to 1/8" around the edges. Paint brown or greens etc.
7) Once the paint has dried completely, it is now time to add the flocking. If you start with standard "white glue" then pour some into a small container (cold remedy cup is perfect) then add twice the amount of water and mix to thin it out. Using an old broad type paint brush, brush on the thinned out glue to where you wish to have the flocking, then sprinkle the flocking liberally over the glue, and allow to dry.
8) Add clumps of heavy foliage as desired

9) This is purely optional but I have found that if you spray a light coat of clear dull lacquer, that it will seal everything in.

Here are the islands completed.
Now with foliage added and airfield detail.

