1) Operation Menace: Part I: Force Y to Dakar, 12 Sep 40 - Quick Start. Part II: Mission to Libreville 18 Sep 40 - Quick Start. Part III: Dakar, 23 to 25 Sep 40 - 200 Point.
Part I, Force Y to Dakar After Mers-el-Kebir tensions between Britain and Vichy France settled down. This all changed at the end of August when, apart from Gabon, French Equatorial Africa went over to the Free French cause. At this time the Free French leader, General De Gaulle, persuaded the British to help him capture Dakar (Operation Menace), the capital of French West Africa. Vichy France, with Axis consent, despatched a cruiser/destroyer force (Force Y) from Toulon on 9 September, under the command of Vice-Admiral Bourrague on the cruiser Georges Leygues, to support Gabon by landing 240 colonial soldiers at its capital Libreville.
Once the British realised a powerful force was heading towards Dakar on the eve of their operation, they sent Force H from Gibraltar, under the command of Vice-Admiral Somerville on the Battlecruiser Renown, in pursuit. Somerville had vague orders to prevent the French reaching Dakar by using “minimum force”? Force Y stopped at Casablanca on 11 September to refuel and take the troops on board, and then departed in the early hours of the 12th before the British could catch them. Bourrague, realising from air reconnaissance that he was being pursued, put on a burst of speed that he knew his destroyers could not maintain all the way to Dakar due to their limited fuel capacity. He therefore sent his destroyers back to Casablanca while his cruisers successfully reached Dakar on the 14th. The three French destroyers would briefly encounter the British during the night of their return, and would be fired on without effect by Vidette. A few days later they successfully reached Dakar without incident.
But what if the British had intercepted Force Y, and Bourrague had refused to turn back?
Note: The Vichy French deployed four submarines around Casablanca to cover Force Y’s departure. I have included one of them in the battle to make the sides equal. I chose Amphitrite as she actually sighted Force H on the night of the 12th.
Set up: Set up and play as per the Quick Start Scenario on page 8 of the 2nd edition rule book. Use the 1st Edition open sea map. A player must accumulate 5 Victory Points for victory.
Force Y – 74 points, 7 units CL x 3: Georges Leygues, Gloire. Montcalm (use Gloire). DD x 3: L’Audacieux, Le Fantasque, Le Malin (use Le Terrible model with Le Fantasque card). SS: Amphitrite (use Proteus model with Antiope card).
Force H – 77 points, 7 units BC: Renown (use Replulse model). DD: Griffin (use ZG3 model with Gloworm card). DD: Hotspur (use Vasilissa Olga model). DD: Encounter (use St. Laurent model with Electra card). DD x 3: Velox, Vidette, Wishart (use Witte de With model with Vampire card).
Special Rule: The Velox, Vidette and Wishart have may not use their Tobruk Ferry Service special ability.
Part II, Mission to Libreville, 18 September 1940 On 18 September the three cruisers of Force Y left Dakar for Libreville to rendezvous there with the light cruiser Primauguet. The troops would be landed and the ships would give whatever support could be rendered. However, the Primauguet had been apprehended by the British cruisers Cornwall and Delhi, and she was subsequently escorted back to Casablanca. Force Y was discovered and shadowed by the cruisers Australia and Cumberland. Bourrague, realising his mission had been compromised, sped back towards Dakar. Gloire suffered engine problems and was overhauled by her pursuers, and herself also sent to Casablanca, though Australia and Cumberland trusted Gloire to make that port on her own as they proceeded to Dakar to join the Operation Menace forces.
This scenario assumes that Force Y joined up with Primauguet before any interceptions. Once again the French refuse to abandon their mission.
Set up: Set up and play as per the Quick Start Scenario on page 8 of the 2nd edition rule book. Use the 1st Edition open sea map.
Force Y – 54 points, 4 units CL x 3: Georges Leygues, Gloire. Montcalm (use Gloire). CL: Primauguet (use Lamotte-Picquet).
British - 45 points, 4 units CA x 3: Australia, Cornwall, Cumberland (use Kent model with Suffolk card). CL: Delhi (use Dragon model with Dunedin card).
Pt III Dakar, 23-25 September 1940 The British attack on Mers-el-Kebir had succeeded in sinking or disabling three of the four Vichy French battleships there. However, the most powerful Vichy French ship, the battleship Richelieu, was still in existence at the West African port of Dakar. As Dakar was astride the vital Atlantic shipping lanes, the British felt they could not risk her falling into German hands.They devised Operation Menace, led by Vice Admiral John Cunningham, to deal with her, and hopefully turn Dakar and French West Africa over to the Allied cause.
The plan was the idea of the Free French leader General De Gaulle. With most of French Equatorial Africa now loyal to De Gaulle, he was encouraged to believe Dakar would do the same; he was badly wrong. The plan went awry from the start. A powerful Vichy French squadron arrived at Dakar shortly before the operation began (see Parts I and II above). A lack of communication with the Royal Navy commander at Gibraltar allowed the squadron to pass unhindered and they duly arrived at Dakar.
In two days of bombardment and air attacks, the allies (Force M) failed to convert the Vichy French, capture Dakar, or destroy the Richelieu. The coastal guns of Dakar exacted a heavy toll on the British ships, and several were damaged. But Cunningham had had enough when on the morning of the 3rd day of the attack the battleship Resolution was torpedoed and nearly sunk by a torpedo from the submarine Beveziers. All three Vichy French submarines bravely sortied to attack, but two (Ajax and Persee) were sunk.
Historically, apart from the submarines mentioned above, the only Vichy French ship that attempted to leave port and attack was the destroyer L’Audacieux, and she was crippled by a hail of gunfire after firing torpedoes at Australia that missed. The Force Y cruisers maneuvered and fired from the harbour, while Martin bombers escorted by Curtiss fighters attacked the allied ships, but without effect. The Allies had failed, and the Richelieu was still a potential threat, although she never did fall into German hands.
Set up: Play this as a 200 point battle. Use the 2nd Edition Battle Map 2.
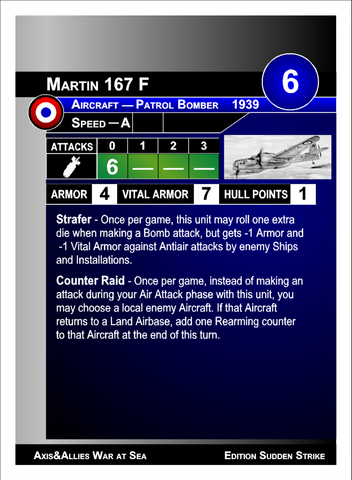
Vichy French: 200 points, 16 units BB: Richelieu. CL x 2: Georges Leygues, Montcalm (use Gloire). DD x 3: L’Audacieux, Le Fantasque, Le Malin (use Le Terrible model with Le Fantasque card). DD: Le Hardi (use Yukikaze model). GB x 2: D’Entrecasteaux, D’Iberville (use T1 Landing Ship model with Dumont D’Urville card). Inst: Dakar coastal batteries (use Heavy Shore Battery). SS x 3: Ajax, Beveziers, Persee (use Casabianca model with Beveziers card). Ftr: Curtiss H75-C1 (use D.520 model with Bloch MB.151 card). PB x 2: Martin 167A-3 (use B-25H Mitchell model with Sudden Strike card).
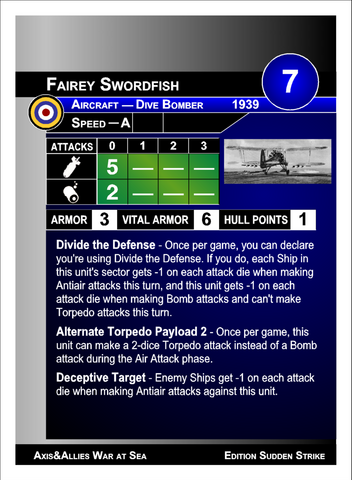
British (Force M): 200 points, 15 units BB: Barham (use Warspite model). BB: Resolution (use Royal Oak model with Ramillies card). CA: Devonshire (use Kent model with Norfolk card). CA x 2: Australia, Cumberland (use Australia model with Suffolk card). CL: Dragon (use Dunedin card). DD: Inglefield (use Bagley model with Faulknor card). DD x 4: Foresight, Forester, Fortune, Fury, (use St. Laurent model with Hotspur card). DD: Greyhound (use Vasilissa Olga model with Glowworm card). Ftr: Skua (use Sea Hurricane model). DB: Fairey Swordfish (use Swordfish MkII model with Sudden Strike card). TB: Swordfish MkI.
Special Rule: The Richelieu has a speed of 0 and the special ability Coastal Facility. Allied ships may not make torpedo attacks against Richelieu. The shallow harbour meant that air launched torpedoes would tend to hit the bottom, as happened to many of the torpedoes launched by the Hermes’ Swordfish (see Design note below). Swordfish torpedo attacks against Richelieu, only, have the special ability Defective Torpedoes.
Special Abilities: Coastal Facility: This unit deploys in a coast or island sector on your side of the map. If you have none, it deploys within three sectors of your side of the map. If you deploy it in a coast or island sector, line of sight to and from this unit isn’t blocked by that coast or island. Defective Torpedoes: Whenever this unit would make a Torpedo attack, roll a die. On a 2 or less, the attack automatically misses instead.
Design notes: Richelieu had been damaged on 8 July by a torpedo form a Swordfish flown from the British carrier Hermes. This damage had only been partially repaired by the end of September and she was not in a condition to sail. I originally gave her the special ability Coastal Deployment, as this would allow her to set up forward next to the Heavy Shore Battery, but in reality they were in the same location. The British battleships should not be allowed to concentrate on one without also being in range of the other.
To get the forces balanced I have had to remove several British and Free French units. All their sloops are assumed to be away protecting the troop and supply transports. No landing could succeed unless the Vichy French defences had first been defeated, which historically never happened. Ark Royal is assumed to be safely away from the battlefield and is screened by three destroyers (Echo, Escapade and Faulknor). The only mention of Echo and Escapade is in rescue operations of downed airmen. I could find no mention of Faulknor in the action. All the others get some sort of active reference. Eclipse is often quoted as part of the attacking force, but it was back at Freetown undergoing repairs and its place had been taken by Dragon. The absence of Ark Royal will make the British aircraft much less effective, but in this battle they had virtually no impact. The Vichy French can sort of attack the Ark Royal with the Counter Raid special ability on their Martins.
Option: Ignore the Special Rule above.
Last Edit: Nov 2, 2022 21:54:36 GMT by admiralduncan
Attack on Convoy BN7, 20/21 October 1940 When Italy entered the Second World War, her Red Sea Squadron at Massawa was instantly isolated. Its main strength lay in three large WW1 vintage destroyers, four smaller slightly more modern destroyers, and eight submarines. Four submarines were quickly lost in the clear Red Sea waters, and the survivors evacuated to Bordeaux on the Atlantic coast. The destroyers, suffering from mechanical breakdowns, a dwindling fuel supply and crew exhaustion from the severe climate, struggled to maintain a viable threat against the well escorted British Red Sea convoys.
The Italians probably had their best opportunity on the night of the 20/21 October 1940 against Convoy BN7. The old but well armed destroyers Pantera and leone, attacked the convoy just before midnight. They were confronted by the sloops Auckland and Yarra. Pantera fired torpedoes and a few shots, and then headed home, joined by Leone which was unable to obtain any targets. The Nullo and Sauro, encountering the convoy separately after midnight, dueled with the New Zealand light cruiser Leander, which damaged Nullo before the Italians retired. Nullo was pursued back towards Massawa by Kimberley, forced aground, and then broken in two with a torpedo. However, Kimberley’s pursuit had brought her within range of the 4 x 4.7” guns of the Harmil Island battery. The Italian gunners hit Kimberley several times, badly damaging the British destroyer before she could limp away, eventually requiring a tow from Leander to Port Sudan. The piecemeal Italian attack failed to overwhelm the convoy escort. A combined attack by all four Italian destroyers might have produced better results.
Set up: Play as a convoy battle. The Allied player sets up as Player 1. There were actually 32 merchant ships in the convoy, but five is enough to for the Italians to have a go at.
Regia Marina – 5 units, 32 points DD x 2: Leone, Pantera (use any Navigatori model). DD x 2: Nullo, Sauro (use Pegaso model with Espero card). Inst: Harmil Island shore battery (use Heavy Shore Battery model with Advanced Naval Base card).
Royal Navy – 5 units, 38 points CL: Leander. DD: Kimberley (use Javelin). DS: Auckland (use Swale model with Ledbury card). DS: Indus (use Halcyon). DS: Yarra (use Sackville). Aux x 5: Jeremiah O’Brien as per the convoy scenario.
Special Rules: 1) Auckland has a speed of 1 and a main gunnery value of 4/4/3. 2) Indus has the special ability Guard the Convoy (see Sackville card) instead of Sweep Mines. 3) Yarra has a main gunnery factor of 3/2/2. 4) The first 4 turns are played under the rules for Darkness.
Design note: The Advanced Naval Base may seem an odd choice for the shore battery, but it works for this scenario. I wanted an installation with mains of 4/4/3. The other details on the card such as the heavy AA will have no effect on this battle. The base will also allow the two small Italian destroyers to deploy forward with their larger brethren.
Last Edit: Nov 2, 2022 21:57:34 GMT by admiralduncan
Battle of Cape Spartivento, 27 November 1940 In the aftermath of the stunning British victory at Taranto, The Royal navy ran a double convoy operation from Egypt and Gibraltar to Malta (Operation Collar). They also used it as an opportunity to return to Britain the old battleship Ramillies and two cruisers in need of repairs (Berwick and Newcastle). The Regia Marina, contrary to popular belief, had not been driven from the Mediterranean. They responded with their two operational battleships supported by six heavy cruises and 14 destroyers. The convoy from Egypt safely reached Malta on 26 November and the ships for Britain (Force D) sailed on to Join to join Vice Admiral Somerville south of Sardinia. Vice Admiral Campioni and his Italian fleet made contact with the British shortly after.
The ensuing action lasted about an hour, and as at Calabria, both commanders were wary to commit to action too heavily. Campioni, with his nation’s only capital ships, was under strict orders not to engage unless ensured of superiority, while Somerville was worried about straying too far from his vital convoy and into Italian air space. The only ships seriously damaged were Berwick, which received two 8" hits in the initial cruiser engagement, and Lanciere, which due to mechanical failures had lost speed and found itself under fire from various British units. The Ark Royal, which had been detached to a safe position in the rear, launched attacks during the action but no hits were scored and no planes shot down. The British convoy of three merchant ships and their escort was even further away. Campioni was promised his own air support from Sardinian airbases, but it would not arrive until the battle was over.
The precious convoy sailed on and arrived in Malta after an inconclusive skirmish with Italian torpedo boats in the Sicilian narrows.
Set up: Play as a 250 point battle. Use the 1st edition open sea map. 375 points are required for victory and each objective marker is worth 125 points.
Special Rule: The Vital Armor on the Ascari card is 7.
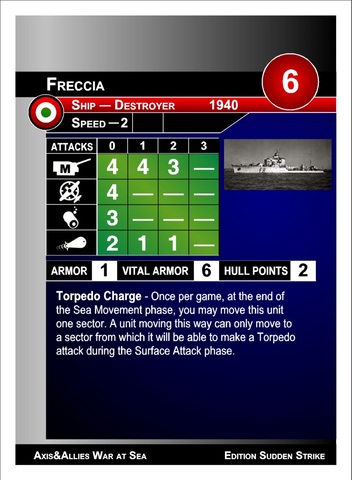
Regia Marina – 247 points, 22 units BB: Vittorio Veneto. BB: Giulio Cesare. CA: Bolzano (use Cape Teulada card). CA x 2: Trento, Trieste (use Trento). CA x 3: Fiume, Gorizia, Pola (use Gorizia or Zara model with Pola card). DD x 3: Dardo, Freccia, Saetta (use Pegaso model with Sudden Strike card). DD x 4: Alfieri, Carducci, Gioberti, Oriani (use Camicia Nere model with Oriani card). DD x 7: Alpino, Ascari, Bersagliere, Carabiniere, Fuciliere, Granatiere, Lanciere (use Ascari).
Royal Navy – 244 points, 21 units BC: Renown (use Repulse model). BB: Ramillies (use Royal Oak model with Ramillies card). CA: Berwick (use Kent model with Suffolk card). CL x 4: Manchester, Newcastle, Sheffield, Southampton (use Sheffield). DD: Faulknor (use Bagley model). DD x 6: Defender, Diamond, Encounter, Firedrake, Forester, Fury (use St. Laurent model with Hotspur card). DD x 3: Hereward, Gallant, Greyhound (use Vasilissa Olga model with Glowworm card). Ftr: Fulmar Mk.II (use Barracuda Mk.II model). Ftr: Skua Mk.II (use Sea Hurricane Mk.IB model) TB x 2: Swordfish Mk.I.
Design Note: To help balance the scenario the Ark Royal, as in Dakar, is assumed to be to the rear of the battle along with two destroyers. This also helps as it enables all her four squadrons to be represented i.e., 1 Fulmar, 1 Skua and 2 Swordfish.
Last Edit: Nov 1, 2022 11:44:49 GMT by admiralduncan
Christmas Convoy Action, 25 December 1941 The German heavy cruiser Admiral Hipper broke out into the Atlantic through the Denmark Strait on the night of 6/7 December 1940. She cruised the North Atlantic convoy routes for two weeks but found nothing. As Hipper was sailing towards Brest to rest and replenish, she ran into convoy WS5A carrying 40,000 troops for the Middle East. This important convoy had a powerful escort of three cruisers. Hipper initially dueled with Berwick and damaged her quite significantly. Hipper also damaged a couple of the convoy ships with her secondary battery, before the remaining two cruisers arrived and drover her off.
Set up: Play as a standard convoy battle. Use the 1st Edition open sea map.
Kriegsmarine CA: Admiral Hipper
Royal Navy CA: Berwick (use Kent model with Suffolk card). CL: Dunedin (use Dragon model). CLAA: Bonaventure (use Euryalus). Aux x 5: Jeremiah O’Brien as per the convoy scenario.
Special Rules: 1) The German player has the initiative for the whole battle. 2) The British player must exit four convoy ships for victory. 3) Admiral Hipper has the special ability Secret Breakout; obviously it only applies to her as there is no other cruiser.
Special Ability: SECRET BREAKOUT: This unit may begin the game undeployed, along with up to one of your Cruisers. Set the undeployed Ships aside. They are out of play. Deploy them together on turn 2 or turn 3 at the end of the Air Return phase in any sector on your side of the map.
Option: The German player may use the Prinz Eugen card for the Admiral Hipper. Crippling Salvo is probably more useful than Raider.
Design Note: The Hipper has little chance in this scenario unless she is very lucky with her initial range 4 shots. Historically, in game terms, she lobbed a couple of range 4 shots at Berwick, crippled her, and then legged in. Hanging around will almost certainly see her demise, although she may take a couple of cruisers with her.
Last Edit: Nov 1, 2022 20:32:44 GMT by admiralduncan
Attack on Convoy BN14, 3 February 1941 Following the unsuccessful attack on Convoy BN7, the Italian Red Sea Squadron made further attempts in December and January, but without finding any convoys. However, on the night of 2 February, three destroyers, this time operating together, contacted Convoy BN14 of 39 merchant ships and their escort.
The Pantera and Sullo both launched torpedoes at the convoy and claimed to have hit two freighters, but did not. Tigre never sighted the convoy. The Italians once again returned to base empty handed. In April, as the Italian East African Empire was collapsing, all operational Italian destroyers attempted a raid on Port Sudan. Discovered on their approach they were all either sunk by British aircraft or scuttled. Their brave stand was over.
Set up: Play as a standard convoy battle. Use the 2nd edition convoy map.
Regia Marina – 3 units, 18 points DD x 2: Pantera, Tigre (use any Navigatori model). DD: Sauro (use Pegaso model with Espero card).
Royal Navy – 4 units, 28 points CL: Caledon (use Dragon model with Dunedin card). DD: Kingston (use Javelin). DS x 2: Indus, Shoreham (use Halcyon). Aux x 5: Jeremiah O’Brien as per the convoy scenario.
Special Rules: 1) Replace the special ability Sweep Mines on Indus and Shoreham with Guard the Convoy. 2) The whole game is played with the rules for Darkness.
Special Ability: Guard the Convoy: While this unit is in the same sector as a friendly Auxiliary unit, enemy units can't attack that Auxiliary unit until this unit has been attacked at least once in the same phase.
Last Edit: Nov 2, 2022 21:21:37 GMT by admiralduncan
Operation Gaudo (Battle of Matapan), 28/29 March 1941 Operation Gaudo was an Italian plan for an aggressive sweep south of Crete by the battleship Vittorio Veneto , commanded by Rear Admiral Iachino, supported by six heavy cruisers, two light cruisers and 14 destroyers. The British, under the command of Admiral Cunningham on board the Warspit,benefiting from code decrypts, sailed their Mediterranean Fleet to intercept.
Early on the morning of the 28th, the British 15th Cruiser Squadron and the Italian 3rd Cruiser Division made contact just south of Gavdos island, south of western Crete. With their battleships still 90 miles to the east, the British cruisers sped off towards them in the hope of drawing the Italians on. Against his orders, Vice Admiral Sansonetti gave chase, but was eventually recalled. Vice Admiral Pridham-Wippell in command of the British cruisers, on seeing the Italian reversal also reversed course until once again driven east by the heavy guns of the Vittorio Veneto. This had been a long range cruiser action, with neither side inflicting any substantial damage during the intermittent bouts of firing.
When Iachino realized British battleships were out in force, supported by an aircraft carrier, he turned for home. The British attempted to slow the Italians down with torpedo attacks. They managed to hit the Vittoreo Veneto with a torpedo, but despite taking on 4000 tons of water, the flagship wasn’t slowed enough to allow the British battleline to catch her. It seemed the Italians would get away, but the last air attack late into the evening put a torpedo into the heavy cruiser Pola and she was brought to a stop. Not realizing the British were quite so near, Iachino sent Fiume and Zara back to assist, along with four destroyers. Caught by surprise by the British fleet in the dead of night, the three Italian cruisers, along with two destroyers (Alfieri and Carducci), were sunk by massive 15” gunfire and destroyer torpedoes, in what would be the biggest Italian naval defeat of the war.
Part of Operation Gaudo was the deployment of a division of five submarines outside Alexandria to catch the British fleet if it sailed west. Only Ambra made contact, but she was unable to make an attack. The submarines have been included in the scenario to make up the Italian points. There were detailed plans to cover the Italian fleet with both German and Italian fighters, but once again Axis land-sea coordination was poor, and in the crucial period no cover materialized. A handful of CR.42 fighters did manage a few minutes over the fleet, and they are therefore also included for their points.
Set up: Play as a 300 point scenario. Use the 1st edition open sea map.
Regia Marina – 303 points, 28 units BB: Vittoreo Veneto (use Roma). CA: Bolzano. CA x 2: Trento, Trieste (use Trento). CA x 3: Fiume, Pola, Zara (use Gorizia or Zara model with Fiume card). CL x 2: Duca Degli Abruzzi, Guiseppe Garibaldi (use Guiseppe Garibaldi). DD x 2: Da Recco, Pessagno (Use Luca Tarico). DD x 4: Alfieri, Carducci, Gioberti, Oriani (use Ascari model with Alfredo Oriani card). DD x 7: Alpino, Ascari, Bersagliere, Carabiniere, Corazziere, Fuciliere, Granatiere (use Camicia Nere). SS x 5: Ambra, Asciaghi, Dagabur, Galatea, Nereide (use Ambra model with Axum card). Ftr: CR.42 Falco (use C.202 Folgore model).
Royal Navy – 303 points, 22 units BB: Warspite. BB: Valiant (use Warspite model). BB: Barham (use Warspite model). CV: Formidable (use Victorious). CL x 2: Ajax, Orion (use Achilles). CL: Perth (use Sydney model) CL: Gloucester (use Sheffield). DD: Stuart (use Bagley model). DD x 2: Janus, Jervis (use Javelin). DD x 2: Mohawk, Nubian (use Cossack). DD x 7: Greyhound, Griffin, Hasty, Havock, Hereward, Hotspur, Ilex (use Vasilissa Olga model with Hotspur card). Ftr: Fulmar Mk.II (use Barracuda Mk.II model). TB: Albacore (use Swordfish Mk.II model).
Special Rule: The Camicia Nere card has a Vital Armor of 7.
Note: To differentiate the Valiant and Barham from the Warspite, either mark them in some way, or use the Royal Oak and Arkhangelsk models.
Last Edit: Nov 1, 2022 21:16:33 GMT by admiralduncan
Action off Sfax, 16 April 1941 With Rommel rampaging in North Africa the British were desperate to cut his supply lines, and so Admiral Cunningham deployed the 14th Destroyer Flotilla to Malta under the command of Captain Mack. They arrived at Malta on 11 April, the same day that axis troops surrounded Tobruk.
On 15 April a Maryland scout plane from Malta sighted an Italian convoy of 5 merchant ships, carrying troops and munitions, escorted by the 8th Destroyer Squadron. Mack's force departed Malta to intercept. As the convoy sailed alongside the Kerkenah Banks off Tunisia the British approached undetected from astern. The British opened fire, taking the Starboard Italian escort, Baleno, by complete surprise and she was a blazing wreck in minutes. The Tarigo and Lampo turned to face the British destroyers while the convoy scattered.
In the confused night fighting that followed all the Italian ships were either sunk or driven onto the Banks, but not before torpedoes from Tarigo had sunk the Mohawk. The convoy had lost 1,700 men, 300 vehicles and 3,500 tons of supplies.
Set up: Play as a convoy scenario. Use the 2nd edition convoy map. Victory conditions are amended as follows: British victory = Sink all 5 convoy ships with no more than 1 destroyer lost. Draw = Sink all 5 convoy ships with no more than 2 destroyers lost. Italian victory = Any other outcome.
Regia Marina – 20 points, 3 units DD: Luca Tarigo. DD x 2: Baleno, Lampo (use Pegaso model with Espero card). Aux x 5: Jeremiah O’Brien as per the convoy scenario. For historical interest they were: Adana, Arta, Aegina, Iserlohn and Sabaudia.
Royal Navy – 32 points, 4 units DD x 2: Janus, Jervis (use Javelin). DD x 2: Mohawk, Nubian (use Haida).
Special Rule: The whole game is played with the Darkness rules.
Last Edit: Nov 6, 2022 13:51:40 GMT by admiralduncan
Battle of Denmark Strait, 24 May 1941 The German battleship Bismarck, commanded by Admiral Lutjens, set off from Germany on 18 May 1941 accompanied by the heavy cruiser Prinz Eugen. The plan for Operation Rheinubung was for the two ships to slip into the North Atlantic via the Denmark Strait and raid the British convoy routes.
The British spotted the Germans early in their voyage and they deployed various forces to contest their passage. The Denmark Strait was patrolled by the cruisers Norfolk and Suffolk, and they sighted Bismarck and Prinz Eugen on the evening of the 23rd. The Germans ran for the open Atlantic Sea as the British shadowed at a safe distance and called for help.
Hood and Prince of Wales, commanded by Vice Admiral Tovey on board Hood, arrived the next morning and battle was joined. Bismarck’s fifth salvo penetrated into Hood’s magazine and the old battlecruiser blew up with only three survivors. Prince of Wales, now outnumbered and with her main guns seriously malfunctioning, retreated. Unfortunately for Lutjens a 14” shell from Prince of Wales had damaged Bismarck’s fuel tanks and this forced him to sail for France for repairs. Prinz Eugen was detached to carry on the operation independently.
Set up: Play as per the Quick Start scenario on page 8 of the 2nd edition rulebook. Use the 1st edition open sea map. Victory is achieved by the first player to accumulate 2 Victory Points.
Sink the Bismarck, 27 May 1941 The destruction of Hood, the pride of the Royal Navy, was a tremendous shock, and a bitter defeat that could not go unanswered. The British immediately committed every resource they had available to hunt down Bismarck.
Bismarck was initially able to evade her shadowers and it seemed she might reach the safety of France, until she was finally spotted again on the morning of the 26th. Swordfish bombers from the carrier Ark Royal attacked in the afternoon and scored a lucky hit on Bismarck’s rudder. Bismarck was now forced to steam on a constant course away from France and towards her pursuers. During the night Bismarck was attacked by a flotilla of destroyers, but she sustained no further damage.
By the early morning Bismarck had finally been run to ground. She was facing two battleships and two cruisers and still was forced to sail on a constant bearing. In the ensuing battle Bismarck was reduced to a smoldering wreck. She finally slipped beneath the waves mid-morning, either by torpedoes, or scuttling charges, or a combination of both.
Set up: Play on the 1st edition open sea map. There are no objective markers, but Bismarck sets up in the central objective marker sector (F4). King George V, Rodney and Norfolk set up in the Player 1 Ship deployment area. Dorsetshire sets up in the Player 2 Ship deployment area.
Victory: The German player wins instantly if the Bismarck exits the map, sinks a battleship, or sinks both cruisers. The British player wins if the Bismarck is sunk before the German player wins.
Kriegsmarine – 53 points, 1 unit BB: Bismarck.
Royal Navy – 139 points, 4 units BB: King George V. BB: Rodney. CA x 2: Dorsetshire, Norfolk (use Norfolk).
Special Rules: 1) The British player has the initiative for the whole game. 2) Bismarck must move 1 sector per turn towards the top left of the map and then exit from sector A6.
Last Edit: Nov 7, 2022 16:34:21 GMT by admiralduncan
Engagement off Sidon, 9 June 1941 The Royal Navy deployed a squadron of light cruisers and destroyers to support the allied invasion of Syria. The Vichy French Navy had only 2 large destroyers, a sloop and 3 submarines available.
Responding to reports that French ships were shelling Australian troops on the coast, four British destroyers, commanded by Commander Tothill, swept north along the coast. The two Vichy French destroyers under Captain Lafond spotted the British first at 1325 and opened fire. Tothill was leading in Janus, with Hotspur and Jackal trailing behind and Isis a further 2 miles south operating inshore. Tothill did not concentrate his ships, but set off in immediate pursuit. The fast and accurate long range fire of the Vichy French hit Janus with 5 shells and brought her to a stop before the other British destroyers could support her. Lafond, seeing the odds drop from 2:1 to 2:3, and with ammunition supply being a major issue, headed back north to Beirut. In the Chase Jackal and Guepard each received a shell hit before the Vichy French escaped. Janus was subsequently towed back to Haifa.
The French shortage of 5.5" shells for their destroyers would result in the next surface clash with the British on the 16th of June.
Set up: Play as per the Quick Start Scenario on page 8 of the 2nd edition rule book. Use the 1st edition open sea map. The first player to accumulate 2 Victory Points wins this battle.
Vichy French – 16 points, 2 units DD: Guepard (use Milan model with Guepard card). DD: Valmy (use Milan). Note: -Either distinguish between the two models in some way or use a Le Terrible model for one of them.
Royal Navy – 32 points, 4 units DD x 2: Jackal, Janus (use Javelin). DD x 2: Hotspur, Isis (use Vasilissa Olga model with Hotspur card).
Special Rule: The British player has movement restrictions. The Jackal cannot begin moving until turn 2, the Hotspur cannot begin moving until turn 3, and The Isis cannot begin moving until turn 4.
Last Edit: Nov 7, 2022 17:36:37 GMT by admiralduncan
Encounter off Beirut - 16 June 1941 Vichy French stocks of 5.5" ammunition for their Levant destroyers was running dangerously low, and so on 11 June the destroyer Chevalier Paul sailed for Beirut with 800 vital rounds. She was sighted by a reconnaissance aircraft late on the 15th as she sailed along the Turkish coast. Swordfish from Cyprus found her at 0300 the next day, and under a bright moon hit her with a torpedo.
Chevalier Paul radioed for assistance, and the destroyers Guepard and Valmy rushed to the rescue. The two destroyers had barely left Beirut however, when they encountered the light cruiser Leander accompanied by the destroyers Jervis and Kimberley. A brief firefight ensued as the French made smoke and hurried back to port. The British were then forced to retire by French aircraft attacks, allowing Guepard and Valmy to leave port once more, but they were only in time to rescue survivors of the sunken Chevalier Paul.
Set up: Play as per the Quick Start Scenario on page 8 of the 2nd edition rule book. Use the 2nd edition Battle Map 2. The British player sets up as Player 1.
Vichy French – 30 points, 4 units DD: Guepard* (use Le Terrible model with Guepard card). DD x 2: Chevalier Paul, Valmy (use Milan). PB: LeO 451 (use Ju88A-4 model).
Royal Navy – 40 points, 4 units CL: Leander. DD x 2: Jervis, Kimberley (use Javelin). TB: Swordfish MkI.
Special Rule: The Chevalier Paul must set up alone, and may not end turn 1 in a sector with another unit.
Last Edit: Nov 7, 2022 18:10:55 GMT by admiralduncan
Raid on Constanza, 26 June 1941 In the early dawn, four days after the Axis invasion of the Soviet Union, a task force of the Black Sea Fleet arrived off the German allied Romanian port of Constanza. Warned of the approaching warships by their submarine Delfinul, the Romanians were ready. The Soviets attacked the port facilities with the two large destroyer leaders Moskva and Kharkov, supported by long range bombers from the Crimea. The cruiser Voroshilov and the destroyer Soorbrazitelnyi were offshore providing support. The Romanians drove the two destroyers off with an aggressive response from their destroyers Regina Maria and Marasesti, supported by the Tirpitz coastal battery and two motor torpedo boats (Viforul and Vijelia). As the Soviet destroyers withdrew, an explosion ripped the Moskva in two, and she rapidly sank. The explosion has been attributed to a Romanian torpedo or mine, and even to a friendly fire torpedo from the submarine ShCh206, but the result was the same. Anti-aircraft fire and Me109 fighters shot down several of the Soviet bombers. The Black Sea Fleet would perform many great feats in WW2, but this wasn’t one of them.
Set up: Play as per the Quick Start Scenario on page 8 of the 2nd edition rule book. The first player to accumulate 4 Victory Points wins this battle. Use Battle Map 02. The Soviets set up as Player 1.
Soviet Union – 50 points, 6 units CL: Voroshilov. DD: Soorbrazitelnyi (use Gromkiy model with Silnyi card). DD x 2: Kharkov, Moskva (use Z18 or Z20 model with Moskva card). SS: ShCh206 (use Ambra model with ShCh307card). PB: IL-4 (use Betty model).
Romania – 52 points, 7 units DD: Regina Maria (use St. Laurent model). DD: Marasesti (use Witte de With model). TBt: Viforul, Vijelia (use Vospers MTB model). Aux: Amiral Murgescu (use M1 model). SS: Delfinul (use S37 model). Inst: Tirpitz battery (use Heavy Shore Battery model with Atlantic Wall-15cm card). Ftr: Me109.
Last Edit: Nov 7, 2022 23:02:41 GMT by admiralduncan