

Naval Battles of WW2 Part III (East), Jan 41 - Aug 42
Jan 11, 2023 15:42:08 GMT
hmsartemis likes this
Post by admiralduncan on Jan 11, 2023 15:42:08 GMT
Battle of the Eastern Solomons, 24/25 August 1942
Seemingly undeterred by their disastrous setback at Midway, the Japanese continued to plan for further Pacific advances. In conjunction with landings at Milne Bay on the eastern tip of New Guinea to capture the Australian airfield at Gili-Gili, they would also run a reinforcement convoy to Guadalcanal.
The Guadalcanal operation would be covered by Japan’s two remaining fleet carriers, with the aim of sinking any American carriers that tried to stop their operation. Sailing ahead of the carriers was a force of battleships and cruisers. It was hoped that these would attract the attention of any American carrier planes, allowing the Japanese to counter with their own. The advance guard would then rush in to finish off any damaged carriers and their escort. Further battleships and cruisers were also on hand to assist if needed. Henderson airfield would be suppressed by bombers from Rabaul and the light Carrier Ryujo, and by bombardments by destroyers. This would allow the troop convoy to land unmolested.
The Americans had assembled a force of three fleet carriers, but on the eve of the battle Wasp and her escorts had been sent away to refuel. The Americans furiously searched for the Japanese fleet carriers but never found them. Meanwhile the Japanese were failing to take out Henderson airfield. The Rabaul bombers were turned back by bad weather, while Ryujo’s few planes and the destroyers did minimal damage. The American carriers then found and sank Ryujo. But not before the Japanese had discovered the American carriers. Two strikes were launched, but only one found its target. Flying through a strong patrol of fighters and heavy anti-aircraft fire the Japanese planes were badly shot up, but managed to land three bombs on Enterprise. Lexington and the damaged Enterprise now retired from the battle, with Enterprise sending her planes to Henderson. This meant that the powerful Japanese surface forces found nothing when they rushed forward for battle.
The Japanese now withdrew their carriers, battleships, and most of their cruisers, but continued on with their convoy. The inevitable air strikes from Henderson shot the convoy up. The destroyer Mutsuki and the Transport Kinyru Maru were sunk and Jinstu was badly damaged. The convoy now withdrew, and the battle was over. This was clearly an American victory. They had stopped the convoy, sunk a light carrier and further attritioned Japanese carrier strength. In return the Enterprise had been damaged, but she was repaired in two months.
The large Japanese battleship and cruiser forces were never really in the battle, and the Americans were never able to attack the Japanese fleet carriers. For this reason, and to make the battles even, I have created two scenarios. The first is closest to the historical battle. The second is the fleet carrier/potential surface battle that never happened.
Scenario 1 – The Convoy Battle
Set up: Play as a 300 point battle. Use the 2nd edition Battle Map 3. The Japanese player sets up as Player 1. The two American Forward Airstrips must be set up on the double island on the American side of the map.
Americans - 350 points, 29 units
CV: Enterprise.
CV: Saratoga.
BB: North Carolina.
CA x 2: Minneapolis, New Orleans (use San Francisco model with New Orleans card).
CA: Portland (use Houston model with Portland card).
CLAA: Atlanta.
Inst x 2: Forward Airstrip.
DD x 2: Balch, Phelps (use Phelps).
DD x 2: Grayson, Monssen (use any Fletcher class model with Wainwright card).
DD x 3: Benham, Ellet, Maury (use Bagley).
DD x 4: Dale, Farragut, MacDonough, Worden (use St. Laurent model with Model with Monaghan card).
Ftr x 3: F4F Wildcat.
TB: TBF-1 Avenger.
DB x 4: SBD-3 Dauntless (use SBD Dauntless model).
PB: B-17E Flying Fortress (use B-24D Liberator model).
Japanese - 353 Points, 35 units
CVL: Ryujo.
CA: Tone.
CA: Chokai (use Atago model).
CA x 3: Aoba, Kinugasa, Furutaka (use Aoba model with Kinugasa card).
CL: Jintsu (use Naka).
DD x 4: Amatsukaze, Isokaze, Kagero, Tokitsukaze (use Yukikaze).
DD x 3: Kawakaze, Suzukaze, Umikaze (use Murasame).
DD x 3: Mutsuki, Uzuki, Yayoi (use Nagatsuku).
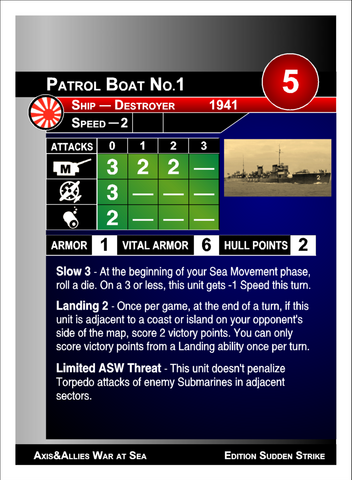
DD x 2: Patrol Boat No1 and No.2. (use Goteborg model with Patrol Boat No.1 Sudden Strike card).
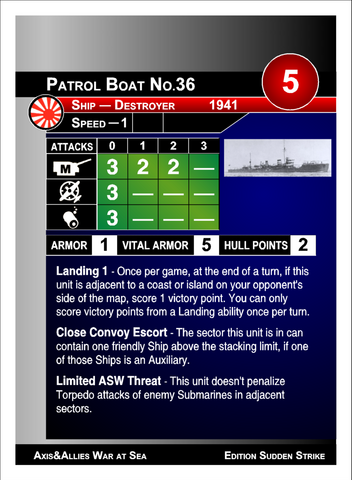
DD x 2: Patrol Boat No. 34 and No.35. (use T1 Landing Ship model with Patrol Boat No. 36 Sudden Srrike card).
Aux x 3: Boston Maru, Daifuku Maru, Kinryu Maru (use Kinai Maru).
Ftr x 2: Elite A6M2 Zero.
Ftr x 1: A6M2 Zeke.
TB x 2: B5N2 Type 97 Attack Bomber.
TB: B5N2 Kate.
DB x 2: Elite D3A2 Val (use D3A Val model).
PB x 3: G4M Betty.
Special Rules:
1) Japanese Patrol Bombers cannot be placed in the American Ship deployment area. This is considered to be out of their range from Rabaul.
Design note: It may seem odd that the Japanese fleet carriers are not in this battle, but the Americans never located them. Their aircraft are present at the Japanese land airbase. There was in fact a huge force of Japanese ships, including battleships and cruisers, that never played any part in the battle and their inclusion would have made the Japanese points total massive.
Scenario 2 – The Carrier Battle (hypothetical)
Set up: Play as a 500 point battle.
Americans - 449 points, 38 units
CV: Enterprise.
CV: Saratoga.
CV: Wasp.
BB: North Carolina.
CA x 3: Minneapolis, New Orleans, San Francisco (use San Francisco model with New Orleans card).
CA: Portland (use Houston model with Portland card).
CA: Salt Lake City.
CLAA x 2: Atlanta, San Juan (use Atlanta).
DD x 3: Balch, Phelps, Selfridge (use Phelps).
DD x 2: Grayson, Monssen (use Fletcher model with Wainwright card).
DD x 6: Benham, Ellet, Lang, Maury, Stack, Sterett (use Bagley).
DD x 4: Dale, Farragut, MacDonough, Worden (use St. Laurent model with Model with Monaghan card).
DD x 3: Aaron Ward, Buchanan, Farenholt (use Hoel model with Gwin card).
Ftr x 3: F4F Wildcat.
TB x 2: TBF-1 Avenger.
DB x 4: SBD-3 Dauntless (use SBD Dauntless model).
Japanese - 449 Points, 32 units
CV: Shokaku.
CV: Zuikaku (use Coral Sea Zuikaku card).
CVL: Ryujo
BB x 2: Hiei, Kirishima (use Kirishima).
CA x 2: Suzuya, Kumano (use Suzuya).
CA x 2: Chikuma, Tone (use Chikuma).
CL: Nagara (use Jintsu or Naka model).
DD: Akitsuki.
DD x 2: Shikinami, Uranami (use Isokaze model with Fubuki card).
DD x 4: Akigumo, Kazegumo, Makikumo, Yugumo (use Yukikaze model with Takanami card).
DD x 7: Amatsukaze, Hatsukaze, Maikaze, Nowaki, Tanikaze, Tokitsukaze, Yukikaze (use Hatsukaze).
Ftr x 2: Elite A6M2 Zero.
Ftr: A6M2 Zero.
TB x 3: B5N2 Type 97 Attack Bomber.
DB x 2: Elite D3A2 Val (use D3A Val model).
Special Rule: Replace the special abilities Landing 3 and Invasion Escort on Nagara with Flotilla Leader and Night Fighter.
Design Note: This is the carrier battle that never occurred. As it is hypothetical I have included the Wasp task force.
Seemingly undeterred by their disastrous setback at Midway, the Japanese continued to plan for further Pacific advances. In conjunction with landings at Milne Bay on the eastern tip of New Guinea to capture the Australian airfield at Gili-Gili, they would also run a reinforcement convoy to Guadalcanal.
The Guadalcanal operation would be covered by Japan’s two remaining fleet carriers, with the aim of sinking any American carriers that tried to stop their operation. Sailing ahead of the carriers was a force of battleships and cruisers. It was hoped that these would attract the attention of any American carrier planes, allowing the Japanese to counter with their own. The advance guard would then rush in to finish off any damaged carriers and their escort. Further battleships and cruisers were also on hand to assist if needed. Henderson airfield would be suppressed by bombers from Rabaul and the light Carrier Ryujo, and by bombardments by destroyers. This would allow the troop convoy to land unmolested.
The Americans had assembled a force of three fleet carriers, but on the eve of the battle Wasp and her escorts had been sent away to refuel. The Americans furiously searched for the Japanese fleet carriers but never found them. Meanwhile the Japanese were failing to take out Henderson airfield. The Rabaul bombers were turned back by bad weather, while Ryujo’s few planes and the destroyers did minimal damage. The American carriers then found and sank Ryujo. But not before the Japanese had discovered the American carriers. Two strikes were launched, but only one found its target. Flying through a strong patrol of fighters and heavy anti-aircraft fire the Japanese planes were badly shot up, but managed to land three bombs on Enterprise. Lexington and the damaged Enterprise now retired from the battle, with Enterprise sending her planes to Henderson. This meant that the powerful Japanese surface forces found nothing when they rushed forward for battle.
The Japanese now withdrew their carriers, battleships, and most of their cruisers, but continued on with their convoy. The inevitable air strikes from Henderson shot the convoy up. The destroyer Mutsuki and the Transport Kinyru Maru were sunk and Jinstu was badly damaged. The convoy now withdrew, and the battle was over. This was clearly an American victory. They had stopped the convoy, sunk a light carrier and further attritioned Japanese carrier strength. In return the Enterprise had been damaged, but she was repaired in two months.
The large Japanese battleship and cruiser forces were never really in the battle, and the Americans were never able to attack the Japanese fleet carriers. For this reason, and to make the battles even, I have created two scenarios. The first is closest to the historical battle. The second is the fleet carrier/potential surface battle that never happened.
Scenario 1 – The Convoy Battle
Set up: Play as a 300 point battle. Use the 2nd edition Battle Map 3. The Japanese player sets up as Player 1. The two American Forward Airstrips must be set up on the double island on the American side of the map.
Americans - 350 points, 29 units
CV: Enterprise.
CV: Saratoga.
BB: North Carolina.
CA x 2: Minneapolis, New Orleans (use San Francisco model with New Orleans card).
CA: Portland (use Houston model with Portland card).
CLAA: Atlanta.
Inst x 2: Forward Airstrip.
DD x 2: Balch, Phelps (use Phelps).
DD x 2: Grayson, Monssen (use any Fletcher class model with Wainwright card).
DD x 3: Benham, Ellet, Maury (use Bagley).
DD x 4: Dale, Farragut, MacDonough, Worden (use St. Laurent model with Model with Monaghan card).
Ftr x 3: F4F Wildcat.
TB: TBF-1 Avenger.
DB x 4: SBD-3 Dauntless (use SBD Dauntless model).
PB: B-17E Flying Fortress (use B-24D Liberator model).
Japanese - 353 Points, 35 units
CVL: Ryujo.
CA: Tone.
CA: Chokai (use Atago model).
CA x 3: Aoba, Kinugasa, Furutaka (use Aoba model with Kinugasa card).
CL: Jintsu (use Naka).
DD x 4: Amatsukaze, Isokaze, Kagero, Tokitsukaze (use Yukikaze).
DD x 3: Kawakaze, Suzukaze, Umikaze (use Murasame).
DD x 3: Mutsuki, Uzuki, Yayoi (use Nagatsuku).
DD x 2: Patrol Boat No1 and No.2. (use Goteborg model with Patrol Boat No.1 Sudden Strike card).
DD x 2: Patrol Boat No. 34 and No.35. (use T1 Landing Ship model with Patrol Boat No. 36 Sudden Srrike card).
Aux x 3: Boston Maru, Daifuku Maru, Kinryu Maru (use Kinai Maru).
Ftr x 2: Elite A6M2 Zero.
Ftr x 1: A6M2 Zeke.
TB x 2: B5N2 Type 97 Attack Bomber.
TB: B5N2 Kate.
DB x 2: Elite D3A2 Val (use D3A Val model).
PB x 3: G4M Betty.
Special Rules:
1) Japanese Patrol Bombers cannot be placed in the American Ship deployment area. This is considered to be out of their range from Rabaul.
Design note: It may seem odd that the Japanese fleet carriers are not in this battle, but the Americans never located them. Their aircraft are present at the Japanese land airbase. There was in fact a huge force of Japanese ships, including battleships and cruisers, that never played any part in the battle and their inclusion would have made the Japanese points total massive.
Scenario 2 – The Carrier Battle (hypothetical)
Set up: Play as a 500 point battle.
Americans - 449 points, 38 units
CV: Enterprise.
CV: Saratoga.
CV: Wasp.
BB: North Carolina.
CA x 3: Minneapolis, New Orleans, San Francisco (use San Francisco model with New Orleans card).
CA: Portland (use Houston model with Portland card).
CA: Salt Lake City.
CLAA x 2: Atlanta, San Juan (use Atlanta).
DD x 3: Balch, Phelps, Selfridge (use Phelps).
DD x 2: Grayson, Monssen (use Fletcher model with Wainwright card).
DD x 6: Benham, Ellet, Lang, Maury, Stack, Sterett (use Bagley).
DD x 4: Dale, Farragut, MacDonough, Worden (use St. Laurent model with Model with Monaghan card).
DD x 3: Aaron Ward, Buchanan, Farenholt (use Hoel model with Gwin card).
Ftr x 3: F4F Wildcat.
TB x 2: TBF-1 Avenger.
DB x 4: SBD-3 Dauntless (use SBD Dauntless model).
Japanese - 449 Points, 32 units
CV: Shokaku.
CV: Zuikaku (use Coral Sea Zuikaku card).
CVL: Ryujo
BB x 2: Hiei, Kirishima (use Kirishima).
CA x 2: Suzuya, Kumano (use Suzuya).
CA x 2: Chikuma, Tone (use Chikuma).
CL: Nagara (use Jintsu or Naka model).
DD: Akitsuki.
DD x 2: Shikinami, Uranami (use Isokaze model with Fubuki card).
DD x 4: Akigumo, Kazegumo, Makikumo, Yugumo (use Yukikaze model with Takanami card).
DD x 7: Amatsukaze, Hatsukaze, Maikaze, Nowaki, Tanikaze, Tokitsukaze, Yukikaze (use Hatsukaze).
Ftr x 2: Elite A6M2 Zero.
Ftr: A6M2 Zero.
TB x 3: B5N2 Type 97 Attack Bomber.
DB x 2: Elite D3A2 Val (use D3A Val model).
Special Rule: Replace the special abilities Landing 3 and Invasion Escort on Nagara with Flotilla Leader and Night Fighter.
Design Note: This is the carrier battle that never occurred. As it is hypothetical I have included the Wasp task force.